
I'm a Barbie Girl...in a Barbie box!
This DIY has probably been the most requested project I've ever had. I made this Barbie inspired box a couple years ago and was able to remake it this time so you can DIY it! I often have a difficult time translating projects I do into DIYs. I usually figure them out as I go, so I forget to capture every step. Since I usually work at a large scale, remaking them takes some time and SPACE, but I'm SO HAPPY I had the opportunity to remake this box!


I always envision this box in so many variations that are not Barbie. This Halloween, I'm attempting to make this into a Trick-or-Treat box. Kids can step into it and take a picture in their costume and have a cool memory of themselves as an "action figure".
I made the box in 2 sizes. One is perfect for older girls (6-10ish) and the other is great for smaller girls (2-5ish), it really depends on height.

Tools:
- 40x60” (1/2” thick) foamboard
- Hot Glue sticks
- Hot Glue gun
- Small Paint roller (4-6" in width)
- Paint tray
- Xacto knife
- Cutting Mat
- Metal Ruler
Materials:
- LARGER BOX: 2 - 4'x8' Foamboard (1/2" thick) ..You can purchase these boards at an art supply store such as Blick Art Supply. If you don't have a local one, you can use 4- 40"x60" boards instead. Download (Large) Cut List here.
- SMALLER BOX: 1- 4'x8' Foamboard (1/2" thick). Download (Small) Cut List here.
- 1- 20x30" (3/16" thick) foamboard
- 1 Quart of Pink paint (I used Behr satin enamel COLOR: Sweet Chrysanthemum)
- 2 cans of White or Pink Rust-O-Leum spray paint
- Barbie Name Templates: Download Barbie Name (Large) here & Download Barbie Name (Small) here.
Costume:
Instructions:
- Using the cut sheet, cut out all your pieces out of the foamboard.
- Glue one side piece to the back of the box. For support, glue one of the top/bottom piece after the side piece.


- Take your second side piece and glue it to the back piece, followed by the second bottom/top piece.
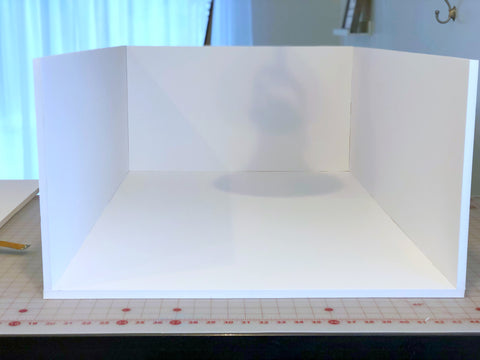
- Once you have all 4 pieces glued together, take your box and spray paint it on the inside and outside. Let it dry. Take your front piece of the box and spray paint the front. let it dry.
- When your box is dry, pour your paint into a paint tray and with the small roller, start painting the inside of your box.

- You'll probably need 2 coats of paint to cover the inside of the box. You could use only the spray paint to cover your box. However, it will most likely be shiny and be reflective in pictures.
- Once the inside of your box is dry, glue the front piece to the rest of the box. Now, you can paint the entire outside of the box.
- Take your 20x30" thinner foamboard and cut it vertically into 2 pieces (10x30" each) Spray paint one of the pieces. Once it's dry, paint it with the pink paint. Set it aside.
- While your box is drying, download the Barbie name template (LARGE or SMALL), print, cut and tape together.
- Trace your BARBIE letters onto the white foamboard piece. Using your Xacto, cut out your letters. Lay your letters on the pink foamboard, about 1/4" apart. Glue them down to the pink foamboard. Using your xacto, cut around all your letters leaving about 1/4"-1/2" of the pink showing as a border. Take the sign and glue to the front of your box.


Adding balloons to this box is the PERFECT finishing touch! Here are some Amazon balloons that would look so cute as an add on:
Barbie Foil Balloons and Inflatable Decor
You're done!!! Now you just need to decide what kind of Barbie you're going to be!
27 comments
thank you so much
Love your idea. Doing a barbie birthday. Gonna try it
What is the color of the paint and how did you find the Barbie letters (Font)?
I did this for a work party and this was so helpful! the letter template made it SO much easier. I looked everywhere and I’m so glad I came across this! thanks so much!!!
I want to know about barbie box
How much
Wt size available