Materials:
- 16 oz. Clear Drink Cups
- Balloon Hand Pump
- 5” Balloons
- 260 Balloons (to make flowers)
- 9” Heart Foil Balloons
- Letter Stickers
- Round Color Stickers
- 260 Balloons (to tie on Foil Heart Balloons)
- Paper Shred
- Candy or Goodie filler
All Amazon Links to products used
Instructions: (Quick Tutorial Video)
- Make a 5 petal balloon flower using a 260 balloon
- Inflate a 5” Balloon (do not tie yet), and insert into the cup. Release the air slowly until it sits snug in the cup. Tie the balloon.
- Insert the neck of the Balloon through the opening of the cup lid.
- Place the flower on the outside top part of the lid. Using the tail of the balloon, loop through the flower petals to secure to the top of the lid.
- Inflate the 9” heart and tie a piece of 260 balloon to the bottom. Using the piece of 260, secure the heart to the top of the balloon flower.
- Peel and stick all the round and letter stickers to the heart creating a friendship bracelet.
- Fill the Cup With shred and goodies and secure the lid to the cup!
The iconic Luck box is up first! How cool does it look next To the 7 foot balloon Pirahana plant?! I made mine out of Foamboard because I made it last minute and couldn’t find a plain cardboard box. Grab a box (at least 18x18”, I used 20x20”), paint it yellow (I used UNMELLOW YELLOW from Behr), and use THIS TEMPLATE to make the question mark! My suggestion would be to use white craft foam or paint it directly on the box with white acrylic paint.
I filled the box with organic balloon clusters to make an overspill. Then, I added all my little balloon Super Mario inspired characters. I have to say, my favorite is the little power up Mushroom! Follow the video below and the template for the goomba face to make your own. These little balloon friends are the PERFECT addition for any celebration or balloon decor piece.
Tools:
Materials:
Hope you have a BLAST making these projects! 💗
Introducing our Balloon Piranha Plants and Luck Box & Bricks Tutorial Bundle! In this bundle, you'll learn how to make a Balloon Piranha Plant in two different sizes and a Luck Box and Bricks party decoration made out of foamboard.
]]>Tools:
Materials:
Instructions:
I added “chocolate” bunny figurines I found at Walmart. Some fresh greenery or florals in between the Eggs would also be soooo pretty! Happy Easter!!
]]>Remember, you can use code: CHSTUDIO to get 5% off at Havinaparty.com
Cherry Sweet
Qualatex Red
Qualatex Pink
Qualatex Caribbean Blue
Tuftex Pink
Blushing Kiss
Tuftex Pink
Tuftex Cameo
Qualatex Chrome Gold
Sempertex Pastel Pink
Sweet Heart
Tuftex Pink
Tuftex Blush
Sempertex Pastel Matte Green
Qualatex Pink
I LAVA YOU
Tuftex Navy
Tuftex Pink
Qualatex Pink
Qualatex Red
The Creative Heart Studio contains affiliate links. This means we may receive a small commission on sales of products that are purchased through links on this site, at no additional cost to you. To check out our Amazon Recommend products, click here.
]]>Valentine’s Day is one of my favorite holidays for Balloons! Pink is all over balloons and well, that’s the way to my heart! I gathered a list of my TOP 10 favorite Valentine Balloons for 2023.
Each balloon is linked to purchase. If you’re shopping on Havin’ A Party, use code: CHSTUDIO for a 5% discount!
#10: Printed Latex Heart Balloons
These are a classic sidekick for Valentine’s Day. Mixed in with solids and Foils, they’re the perfect staple for any gift bouquet.
If it’s a sweet and it has a cute face on it… it will definitely be a favorite of mine! This one is simple and bold. (Anagram Foil)
These bright conversation hearts are fun and I LOVE that there are different variations of them. I do wish they were lighter in color and maybe a little bigger, but they’re so cute and fun! (Anagram Foil)
#7: I Love You Heart with Arrow
My favorite part about this foil is that is BIG! It’s 36” and definitely makes an impact. It’s such a classic look and pairs perfectly with any look for Valentine’s. (Kaleidoscope Foil)
This sweet foil has been a top top favorite of mine for a couple of years. The simple Simple design of the ice cream and the pop of red with the heart is perfection. (Betallic Foil)
#5: Love at First Sight Glasses
These Heart sunnies are new this year and they are fun fun fun! They have 2 beautiful pink tones and the white highlights really make them look so sparkly! (Tuftex Foil)
#4: Candy Hearts Bubblegum Machine Foil
Conversation hearts, pastels, and sweets! It’s the perfect trifecta for me! I’ve loved this one since it came out last year. It’s so cute and colorful without being to whacky for my taste. And don’t even get me started on the possibility of an “I CHEWS YOU” valentine pun. (Qualatex Foil)
#3: Addressed to my Sweetheart Foil
This cutie REALLY STOLE my heart! It’s simple but makes an impact! I love love the pink envelope with red printing with the hint of aqua for the stamp. It’s just so beautiful! (Qualatex Foil)
#2: Heart Convo Latex Balloons
This set didn’t make it to #1 ONLY because I wish they were smaller. Since small colorful hearts have been discounted everywhere, these are the next best thing! The colors are perfect pastels and the printing is great on these. Imagine covering a wall full of them for a photoshoot??! Also, they’re an AMAZON find so the convenience is the cherry on top!
Ok.. now THESE are pastel heart foils! OMG.. they are soooo beautiful! They’re a standard 18” heart but the colors are just WOW! The finish almost reminds me of gum balls because it’s not satin but also not the standard foil Finish. The picture does their colors justice! I love the possibility of also turning these into conversation hearts with red or hot pink vinyl! The ONLY draw back on these is they lasted great air filled but with helium, It seemed to escape in less in than 24 hours.
The Creative Heart Studio contains affiliate links. This means we may receive a small commission on sales of products that are purchased through links on this site, at no additional cost to you. To check out our Amazon Recommend products, click here.
]]>It’s been 2 years since then and there have definitely been updates and adjustments based off of how I work.
UPDATE #1 (work table):
The best update I did to this room was creating a custom work table. We DIYed it with 4 bookshelves from Target and plywood cut to fit the cutting mat I use. Aside from that, I got a rolling cart with drawers that houses all my supplies that I use on an every day basis. This cart keeps everything organized and off of my tabletop!
UPDATE #2 (Ikea Boaxel System)
The Boaxel system that was installed originally is GREAT! However, the way it was setup was NOT working.. I added more drawers and created an overstock balloon section and shipping station with all the products of our online store at easy reach.
UPDATE #3 (White Bins and Shelves)
This is an ever changing area because I constantly change out the materials in my crafting shelves. To keep consistency and a clean look, I made sure to keep all white bins with labels on the outside. The short utility bin dividers are very useful to store our patches.
UPDATE #4 (Balloon Wall)
The balloon wall didn’t really change except for the actual inventory in the clear jars. I increased the variety of colors, and reduced the sizing and type of balloons of each color.
Overall, the room works SOOOO GOOD! The most important thing is I always note what my natural work flow is and adapt as I go. If you’d like to see a more visual tour, there’s a video over on my Instagram.
Happy Organizing!
]]>
Tools:
Materials:
Instructions:
Can't wait to see what you come up with!!
]]>
Additional Supplies (aside from Balloon Mosaic template list):
Steps:
Using a Balloon Mosaic Number Template, build the structure. The only difference will be, it MUST be built backwards. Instead of building the side walls up from the number base, build them away from the number base.Once the Balloon Mosaic Number is built, place it on a foamboard where it fully fits. Lay it with the number base on the foamboard and trace around it. Using an Xacto, cut the number shape out of the Foamboard. Measure 1" marks around the entire border and connect them to create a 1" frame around the number. Cut out the middle with the Xacto knife. Spray paint the number using an oil based glossy paint and the new frame. Once dry, use a roller and latex paint in 2 colors. Paint the front of the number base in the lighter color with a paint roller.Paint the insides of the frame first and then hit glue onto the dry Number Base.
Roll the darker color paint on the frame and the sides of the Number Base.
For weight, drop a brick paver or small sand bag to stabilize the Number and prevent it from toppling over.
Can't wait to see your creations!
]]>
For yearsssss, I’ve wanted to make faux gingerbread houses I could use every year and add to them. My goal is to have a full faux gingerbread replica of Main Street in Disney World one day! 🥰 For now, I started with 3 Faux gingerbread houses and I couldn’t be happier!
Tools:
- Decorating tips (I used a round #2)
Materials:
- Paper Mache Houses (Any kind of house works too)
Instructions:
1. Prep the decorating tip with the piping bag. Cut the tip off of the piping bag, insert the coupler from the top, add the tip, and screw the tip secure with the 2nd coupler piece.
2. Mix some of the modeling paste with some water. Add the water a little at a time until the consistency is soft but NOT watery. This will allow for the paste to flow smoothly out of the piping tip.
3. Once the modeling paste is ready, fill the prepped piping bag.
4. Lay the Paper Mache house on its back to begin decorating. Allow about 30 minutes of drying before moving on to the next side of the house until completing it.
That’s it! Pretty simple process and beautiful outcome!
]]>Tools:
- Scissors
Materials:
- (41) 11” Balloons for tree (1 balloon for tree topper and 5 balloons to add to the bottom row)
- (110) 5” Balloons (10 balloons for top 2 rows of tree and approximately 100 balloons for filling in entire tree)
- (5) 260q long balloons (optional for garland)
Instructions:
1. Take the floor lamp, cut the cord out. Determine the height desired and assemble the lamp, minus the bulb mechanism and shade.
2. Using the Balloon Inflator, blow up 5 of the 11” balloons. Inflate them as big as you can WITHOUT risking popping. This will become the first layer of the tree.
3. Tie two balloons together and then tie three balloons together.
4. Twist the Balloon sets around the pole to secure them.
5. Repeat this process over and over until the entire pole is covered. Before inflating all the balloons for the next layer, ensure the first balloon of that layer is slightly smaller than the layer before. Measure all the other balloons for that layer against the first balloon to make sure the balloons are all uniform in each individual layer.
6. For the top 2 layers, I used the 5” balloons to make sure the tree tapered off correctly. Once all the layers are completed, inflate and attach a single 11” Balloon to the top. Tie it to the top layer of balloons to secure it. You could also attach a foil star balloon for a different look!
7. Now that the main structure of the tree is complete, inflate and adhere 5” balloons to the entire tree using ZOTS or glu dashes, to fill all the gaps. This will give the tree a more organic look. Another way to adhere the smaller balloons to the tree is tying together bunches of 2,3 or 4 balloons. Once the bunches are made, tie the ends of a 260q to each bunch. Using the 260q, tie the bunch in place and lace the 260 into the base of the tree.
8. For the pink garland, inflate a 260q with a hand pump. Using 4 pumps, inflate and tie the 260q balloon. Make a bubble by twisting about 1.5” inches of the balloon. Make sure to twist at least 5 times.
9. Repeat this process over and over, until the entire balloon made up of bubbles. NEVER let go of the fit’s bubble or last, otherwise it will come undone. Using a glue dot or the glue gun, adhere the first and last bubble to secure the garland.
]]>
Tools:
Materials:
Instructions:
]]>
Tools:
Materials:
Tools:
Materials:
Instructions:
* Some of the links in this post may be affiliate links to products. All opinions and recommendations are 100% my own.
]]>
This DIY is simple and easy! Best of all, you can fill it with goodies for an extra surprise!
Tools:
- Electric Balloon Pump
- Scissors
- Glu dashes
Materials:
* Candy and Confetti Optional
FREE SANTA TAG PRINTABLE
SANTA BAG
- 1 White 350q balloon
PRESENTS
CHRISTMAS TREE
Instructions:
For this DIY, I’ve made a video to follow! Merry Christmas!
]]>Professional pictures by @weelovephotography.
This year, I've received lots of questions already on how to make them. I decided to add a different twist on them to make them look even MORE like ornaments! I promise it's SOOOO EASY!
Tools:
Materials:
Instructions:
That's it! They look beautiful just like this. If you want to add decor to them to look even more like ornaments, I have some steps below to achieve that!
Snowflake Ornament:
Snow Drip Ornament:
Additional Materials:
Instructions:
* Some of the links in this post may be affiliate links to products. All opinions and recommendations are 100% my own.
]]>For the Balloon Mosaic Templates of the Skulls, click here.
Tools:
Materials:
Instructions:
My kids’ school doesn’t allow candy for Halloween goodies, so I’m always in search of cool giveaways! Balloons are perfect for this!
Tools:
Materials:
Instructions:
For the DIY Oversized Trick or Treat Bag Template, click here.
A couple of years ago I made this bag with balloons spilling out of it even larger for our Trunk or Treat setup. This time around I made a bit smaller and with faux candy so we can display it in other years. Enjoy getting creative with this project!
OVERSIZED TRICK OR TREAT BAG
All instructions and materials are listed in the DIY TEMPLATE for the bag
FAUX DIY CANDY
Spice Gumdrops:
Tools:
Materials:
Instructions:
Candy Sticks:
Materials:
Instructions:
Cotton Candy:
Tools:
Materials:
Instructions:
Chocolate Bar:
Tools:
Materials:
Instructions:
Tools:
- Hot Gluegun (low temp)
- Scissors
Materials:
- 1 Cardboard box (sized to child)
- Ribbon
- Headband
Instructions:
1. Take a cardboard box and tape the flaps to the inside of the box.
2. Using a paint brush, paint on the red and white stripes to the box.
3. Once The cardboard box is dry, attach 2 pieces of ribbon to hang the the box on child’s shoulder. Make sure the ribbon is measured to a comfortable length. (TIP: using felt strips might be more comfortable. I used ribbon in this instance, but would use felt strips next time)
4. Decorate the front of the cardboard box with paper, felt or sticker letters spelling out POPCORN.
5. Inflate all the 5” balloons at different sizes using the hand pump.
6. Tie the balloons into sets of 2. Then take sets of 2 and twist them onto each other to make sets of 4.
7. Begin inserting the sets of 4 balloons along the border of the cardboard box. Using the low temperature glue gun, secure the balloons to the box. (You can also glue each balloon individually to the box). Make sure to leave a little space between the balloons on the sides of the box where arms will be. This will allow for wiggle room.
This costume is so fun and would be perfect for multiple kids! Each kid can dress up as a different movie snack.
Tools:
Materials:
Costume:
Step by Step:
]]>
Tools:
- Electric Balloon Pump (optional)
- Scissors
- ZOTS, Low Temp Glue gun, or Glue Dashes
Materials: (Always purchase extra balloons for popping accidents)
LARGE CRYSTAL BALL
1- 30” Marbled Balloon
SMALL CRYSTAL BALL (Marbled)
1- 11” Marbled Balloon
SMALL CRYSTAL BALL (Purple)
- White Acrylic Paint and Paintbrush
NOTE: For the purple crystal ball, paint the details on using the white acrylic and paintbrush.
For me, Halloween decor is always about the fun candies. This DIY is perfect to represent all that good stuff!
Tools:
- Electric Balloon Pump (optional)
- Scissors
- ZOTS, Low Temp Glue gun, or Glue Dashes
Materials:
Remember to always purchase extra balloons for popping accidents!
3 Candy Corns: 1 Orange, 1 Yellow, and 1 White 160q Balloons (Makes 3 Candy Corns)
Lollipop #1: 1 Pink, 1 Rose, 1 White 160q Balloons
Lollipop #2: 1 Wild Berry, 1 Yellow, and 1 White 160q Balloons
TRICK-OR-TREAT!!!
* Some of the links in this project post are affiliate links.
]]>
Tools:
Electric Balloon Pump (optional)
ZOTS, Low Temp Gluegun, or Glue Dashes
Materials:
** Always purchase extra balloons for popping accidents!
BROOM:
8- 260q Balloons (broom head)
1- 260q Balloon (handle)
* This year I changed up my broom a bit (pictured above). I used 3-260q in mocha and 2-160q chocolate brown for the broom head. For the handle, I used 1-260q chocolate brown and pinched the balloon where I wanted it to bend.
CAULDRON:
1- 3ft Balloon
3- 260q Balloons (bottom and top rim)
40- 5” Balloons (this is a minimum amount. The larger you inflate your 3’ balloon, the more balloons you’ll need to fill the cauldron. You may also want to mix 11” balloons if you’re making a large cauldron)
]]>
Tools:
Materials:
ALWAYS PURCHASE EXTRA BALLOONS FOR POPPING ACCIDENTS.
Instructions:
HAPPY EASTER!!!!
]]>This project is so cute and fun because you can fill with treats and makes for a great surprise gift!! Add a lip balloon and it’s the perfect Valentine’s Day pun ❤️
TOOLS:
MATERIALS:
INSTRUCTIONS:
*NOTE: instead of cutting out and building base out of foamboard, you can use round disposable baking pans as well and skip to step 4.
]]>
I've always wanted a gingerbread house village among a forest of Christmas trees. This year, I'm finally doing it and got inspired to make a life sized (kid sized, really) what I'm calling a GingerBOARD house DIY! With it's own forest of Winter White artificial Christmas trees from TREETOPIA. It's perfect for prop decor, kids to play with, and photoshoots!!
Tools:
Materials:
Instructions:
Assembling the Gingerbread House:
]]>
ENTRYWAY:
For this area, I took out the year round decor into plastic containers and hauled them to my storage.
I added:
- A wreath with eucalyptus sprigs and cypress sprigs. I took the cedar sprigs from this wreath and added a bow made out of cable knit ribbon.
- A wooden gingerbread Bakery sign I found at Michaels.
- A custom made wooden tray for Goodies for Santa! (Got is made from His and Her Workshop last year). My friend, Kenia found me the cutest Rae Dunn items and I threw them in there for a final touch!
- On the bottom of the Entry table is a small 2 ft tree I‘ve had for years and added some twinkle lights to it.
LIVING ROOM:
- Added some bottle brush trees to the coffee table tray
- Felt Christmas tree garland behind the couch on the ledge from KailoChic
- MERRY Throw pillow for a small touch on the couch.
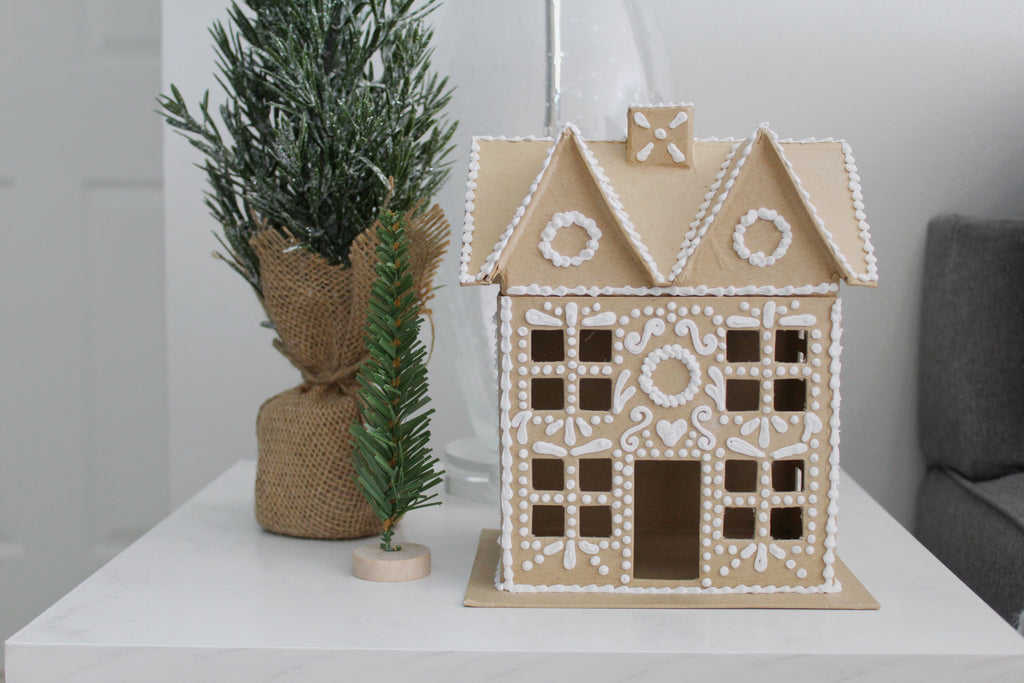
- Faux Gingerbread House on the side table with a bottlebrush tree
- Small 2ft tree on the floor to add some warmth
- Blanket Ladder with Stockings, Wreath, and twinkle lights.
CHRISTMAS HOUSE VILLAGE:
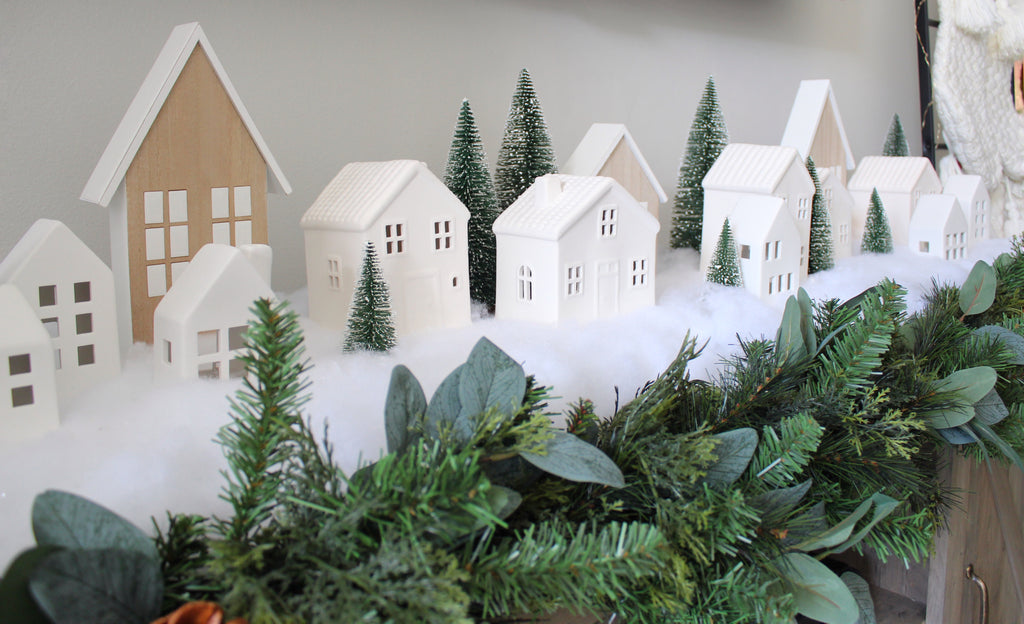
For the village, I used 4 paper trays to elevate. I covered them with white felt and then with a snow blanket. Then I added all the ceramic houses and wooden houses I’ve collected over the years and bottlebrush trees.
In front of the village I added a 9 ft Pine Garland in an asymmetrical layout. I added the same eucalyptus and cedar sprigs like in the entry wreath. To attach the garland, I used 2 clear command hooks on each end of the tv stand.
CHRISTMAS TREE:
The Christmas tree in our home is ever changing. Every year, I change my mind about something on it. This is the MOST stressful part for me. Why? Because I LOVE the way FULL trees look but when I start doing it, I feel overwhelmed and go simple. I love the way simple looks too. As a result, I always make sure to have a beautiful full tree to start off with.
These are the steps I take to decorate my tree:
1. I always start with ribbon. I use a tuck technique where I cut pieces of ribbon (12-14”) and pinch the ends, tie with wire and then wire to the tree. I make sure to start the edges tucked inside the tree and not on the surface.
2. Large decorative ornaments. This year, it was wooden gingerbread houses.
3. Snowflake cookies and Felt Gingerbread ornaments
4. Large and Medium Ornament Balls
5. I finish the tree with smallest ornament balls to use as fillers. As I’m placing and ornament balls, I always make sure to place some tucked inside the branches and some more to the surface.
DINING ROOM:
For the dining room, I wanted one LARGE piece in the middle since we have a round dining table now. Since I have the classic gingerbread look throughout, I decided to create a Snow globe. I purchased a large cloche from Potterybarn. This thing is BIG and I love it! I then enlisted my friend Love Paper Creations help, and she cut me a wooden house. I painted it and using the same technique from the Faux Gingerbread Houses. I added some fake snow and bottlebrush Trees and it came out just lovely.
I added some Christmas trees in the corners of the dining room and I’m so happy I did. I was skeptical at first but can’t believe I haven’t done it before! On the side table, I spray painted some wooden nutcrackers and added the same garland and springs to the front.
With all the madness of 2020, I’m really glad I went the extra mile in decorating this year for our home. The kids have especially enjoyed it and even got some decorating in their room too!
I typically stay home A LOT! I work from home so staying in is pretty easy for me. Recently, I had been really frustrated with my work room. It wasn't even a work room really. It was more of a storage/catch all room and there wasn't any room to actually work in there. With our online Balloon Shop growing and Balloon Mosaic Kits requiring space, it was really time to invest and attack this room with an actual plan. These BEFORE pictures make me cringe, but important to show the process!
BEFOREAFTERBEFOREAFTER
I'm a pretty organized person, but was so stuck on design and a vision for this room. I got to work on a plan and figure out what spaces I needed. This room is a converted garage and I only have access to 3 walls in it (4th wall is where our laundry area is. First, I evaluated what worked for me. The only thing that pretty much worked in this room was my rainbow balloon wall that I've had for almost 3 years!!! That was definitely a keep, but needed to add more of the containers and shallower shelves. I went with the BILLY BOOKCASES from IKEA.
I also knew I needed storage for all my non balloon crafting supplies and a shipping area with lots of storage and room to grow adding inventory of product. For this area, I already had the FJALKINGE shelving from IKEA and purchased tons of white containers that would stack for it. I had two of the three walls covered with shelving (craft storage and balloon wall).The shipping/product wall however, that was just not coming to mind. I just couldn't figure something out that utilized every square inch.
At this point, I decided to hire a professional organizer that could help me. We had a FaceTime call to show the space and my needs. Even though I was 75% of the way through my design, I knew a fresh set of eyes would be just what I needed. The most valuable part of this experience was seeing the organization options she suggested. The BEST one was the system for the shipping station!!! It covered every inch of the wall and gave me as much storage as possible. It's the BOAXEL SYSTEM from IKEA. It's similar to the ELFA system from the Container Store but for a lot less! The great thing was Diana (professional organizer) took care of planning the system and the installation process. Once everything had been installed, I realized I had space to get more drawers, so we added another 4 to the left side of the system. We still need a space for the large shipping boxes and they fit perfectly on the right side after adjusting some shelves.
Once I cleared out the room and categorized everything for Diana, she came in and began putting away most of the items. I finished up once the rest of my bins and containers came in. It was a great investment to hire Diana, because she gave me a great head start. I felt much better about organizing once I had fresh eyes on the project. I have a specific workflow and once I got in my groove, designating homes for everything and labeling was quick.
Then, we had the happiest little accident!!! We had a new tabletop and 2 bookshelves leftover. I didn't want to toss them, so the hubby attached them back to back with brackets and attached the tabletop. Voila! I got a brand new table that is counter height and not killing my back!! I tossed in pink area rug and the cutest pom pom baskets from Target. It's been a few weeks since I've been working in this room and it's my favorite room in the house now! It's wayyyyy more efficient to ship out orders, work, design, sketch, and store materials. The only thing I'm missing is a comfy stool and I'm set!
MATERIALS USED FOR THIS PROJECT:
- Large Containers on Craft Supply Wall
- Medium Containers on Craft Supply Wall
- Small Containers on Craft Supply Wall
- Shallow Craft Paint Containers
- Shelves for Craft Supply Wall
- Travel Laundry Basket for Balloons
- Craft Turntable Organizer (WHITE)
- Craft Turntable Organizer (BLACK)
]]>
Have you heard of Tangi? It's a new short form video app that will surely keep you busy with all it's content! There are tons of videos on the app and my favorite part? It's searchable!! So when you type in Balloons, you'll find all the videos related to that search. Videos are short (about 1 minute long) and fun and beyond inspiring!!
I partnered with Tangi to create some quick balloon DIY videos and they’ve been a hit! They’re so simple and really make a big impact for party decor or photos! Learn how to make:
Download the app and get going! I promise you'll love it. Make sure to follow me on there at thecreativeheartstudio and check out other amazing creators.
I'm so excited to be a Tangi Creator and looking forward to providing quick and easy videos to keep you ballooning!
]]>
Tools:
Materials:
Instructions: